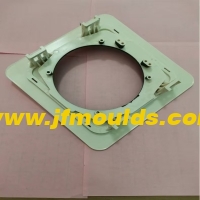
Susunan rongga dan permukaan perpisahan acuan
Susunan rongga dan permukaan perpisahan acuan
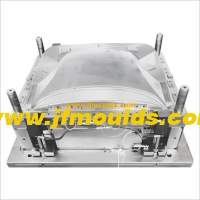
Membentuk bahagian merujuk kepada bahagian acuan yang secara langsung mengambil bahagian dalam pembentukan ruang rongga, seperti pulangan mati (rongga), punch (teras), sekeping, penarik teras lateral, dan lain-lain. Apabila mereka bentuk bahagian-bahagian yang dibentuk, pertimbangan penuh harus diberikan kepada kadar pengecutan cetakan plastik, cerun demolding, dan proses untuk pembuatan dan penyelenggaraan.
Reka bentuk bahagian yang terbentuk secara amnya boleh dijalankan dalam langkah -langkah berikut
① Tentukan bilangan rongga acuan
② Tentukan kedudukan rongga.
③ Tentukan garis perpisahan bahagian plastik dan permukaan perpisahan acuan
④ Apabila penarik teras lateral diperlukan, reka bentuk mekanisme penarik teras lateral.
⑤ Tentukan dimensi pembentukan rongga teras dan sudut draf
⑥ Tentukan kaedah kombinasi dan penetapan bahagian yang terbentuk
Pengilang acuan bangku di China (jfmoulds.com)
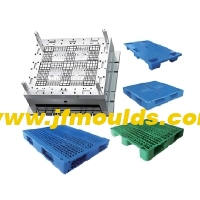
Tentukan bilangan rongga
Sekiranya mesin pencetakan suntikan yang sepadan dengan acuan telah ditentukan terlebih dahulu, bilangan rongga dapat ditentukan dalam dua cara berikut
(1) Menurut jumlah suntikan yang diberi nilai mesin suntikan yang digunakan
(Jumlah berat bahagian plastik di setiap rongga + konkrit dalam sistem gating) 80% daripada jumlah suntikan yang diberi nilai mesin suntikan
(2) Menurut daya pengapit yang diberi nilai mesin suntikan
Dengan mengandaikan jumlah kawasan yang diunjurkan setiap rongga dan pelari di permukaan perpisahan adalah bahagian S (mm ²), daya pengapit yang diberi nilai mesin suntikan adalah bahagian f, dan tekanan purata cair plastik pada rongga adalah jenis, kemudian
S isi rumah jenis f kunci x 80%
Satu: Penjajaran rongga
Prinsip kedudukan
① Prinsip saluran aliran terpendek: Kurangkan bahan kukuh dalam sistem gating, dan simpan kos pembuatan keluli dan acuan.
② Prinsip keseimbangan suhu: Pastikan bahawa suhu di semua bahagian rongga acuan adalah kira -kira sama dengan menjamin bahawa kadar pengecutan bahagian plastik di setiap rongga adalah sama.
③ Prinsip Baki Tekanan: Pastikan daya yang dihasilkan daya tegangan yang beruang acuan semasa suntikan adalah dekat dengan pusat acuan dan dalam garis lurus dengan daya pengapit mesin pengacuan suntikan.
④ Prinsip keseimbangan makan: Untuk acuan dengan pelbagai rongga dalam satu acuan, bahagian plastik yang sama harus diberi makan dari kedudukan yang sama untuk memastikan pertukaran bahagian plastik. Saiz dan panjang pelari dan pintu harus disesuaikan dengan saiz bahagian plastik, dan perlu untuk memastikan semua rongga diberi makan dan diisi serentak sebanyak mungkin.
Langkah berjaga -jaga untuk susunan acuan dengan pelbagai rongga dalam satu acuan.
Bahagian plastik yang lebih besar atau lebih kompleks harus diletakkan berhampiran pelari utama, iaitu lengan pintu. Walau bagaimanapun, rongga tidak boleh diatur dalam diameter 30mm di sekitar lengan pintu sebanyak mungkin, atau ketebalan keluli dari rongga ke lengan pintu harus sekurang -kurangnya 8mm.
Untuk acuan dengan pelbagai rongga dalam satu acuan, ketebalan keluli di antara setiap rongga dan ketebalan keluli b dari rongga ke tepi sisipan acuan dalaman boleh dipilih berdasarkan kedalaman rongga. Lebih mendalam rongga, semakin tebal ketebalan keluli.
Special circumstances include:
When a concealed gate is used, there should be sufficient space for the concealed gate and the position for arranging the push rods
b. When the plastic part is large in size and the cavity is deep (60mm)
c. The size of the plastic part is relatively large, and the inner model core is inlaid through. At this point, the insert forms a frame structure 1 with poor rigidity. The steel thickness should be increased to enhance rigidity.
When cooling water needs to be passed between the cavities, the distance between the cavities should be larger to ensure that the steel thickness between the cavities and the cooling water channels is no less than twice the diameter of the water channels.
Sure enough, when the mold needs to be core-pulled from the side, the sequence should give priority to core-pulling from the left and right sides, and try to avoid core-pulling up and down.

Two: Parting surface
The main contents of parting surface design
The main contents of parting surface design are as follows.
① Position of the parting surface: Which part is formed by the moving mold and which part is formed by the fixed mold.
② Shape of the parting surface: Is it a plane, an inclined surface, a stepped surface or an arc surface
③ Positioning of the parting surface: How to ensure the positional accuracy of the core and cavity, and ultimately guarantee the dimensional accuracy of the plastic part
2. General principles for the design of parting surface positions
(1) The principle of aesthetic appearance
The selection of the parting surface should minimize its impact on the appearance of the plastic part. Especially for plastic parts with clear requirements for appearance, more attention should be paid to the influence of the parting surface on the appearance
(2) The principle of convenient processing
The selection of the parting surface should make the mold structure simple and easy to process, especially for the processing of the core and cavity.
(3) The principle of easy molding
The selection of the parting surface should be conducive to the pouring of the melt, the venting of the cavity and the design of the cooling system. Usually, when designing the parting surface, designers often encounter problems where there are more than two demolding directions on the plastic part.
For the shorter stroke demolding direction, the slider is used for lateral core-pulling. However, when the lateral core-pulling mechanism closes the mold, the clamping force it can provide is relatively small. If the projected area of the plastic part in this direction is large, problems will occur. For molds with inserts, the simplicity and convenience of insert installation should also be taken into consideration.
(4) Smooth demolding principle
The selection of the parting surface is conducive to the demolding of the plastic part, ensuring that the plastic part remains on the side with the ejection mechanism during mold opening (sometimes it is.
(Moving mold, sometimes fixed mold.)

Three: Shape design of the parting surface
The shape of the parting surface is best when it is a plane perpendicular to the mold opening direction, followed by inclined surfaces, then smooth arcs, stepped surfaces, etc. The parting surface shall not have sharp corners or edges. Sharp corners and edges will make processing more difficult and also affect the sealing material of the parting surface and the service life of the mold.
(1) Step parting surface
There are multiple options for the parting surface of this plastic part, and the final choice often depends on the customer's requirements.
(2) Inclined parting surface
The inclined parting surface should be equipped with a stop mouth positioning surface to counteract the horizontal component of the expansion force. The positioning surface is determined based on the actual situation and can be on either side. Both (a) and (b) are acceptable. The inclination Angle of the positioning surface. It is generally 10 "to 15". The greater the slope, the worse the positioning effect. The inclined parting surface should extend outward by 5 to 10mm according to the Angle of the parting surface to prevent the edge of the cavity from cracking and to avoid movement during the FIT mold.
(3) Curved surface parting surface
The design of the curved surface parting surface is roughly the same as that of the inclined surface parting surface. In the figure, A=5 to 10mm, and the inclination Angle ea is generally 10 to 15°
(4) The parting surface that is rubbed through or bumped through on the side
If the threading as shown in Figure 4-5(b) is adopted, the formed plastic part has no wire clamping, as shown in Figure 4-5(d), but the plastic part is prone to flash, and the flash is balanced with the side hole, reducing the size of the hole. When rubbing through, it is best to have a slope of 3 or more on the side. If the piercing method is adopted, the plastic part can see the wire clamping, but it is not easy to have flash. Even if there is flash and it is perpendicular to the hole, it does not affect the size of the hole. a is taken as 6°-10°. If c is chosen, it can be suggested that the customer make a slope of 3° to 5° on each side of the bump hole, so that there will be no wire clamping.
(5) The parting surface of the inclined square hole
The inclined square hole should be given priority for penetration. The condition for penetration is that if a<1° in the figure, the lateral core-pulling a 3° should be given priority.
(6) There is a raised parting surface on the side
There is a raised structure on the side. The parting surface should be prioritized for lifting, but this will cause wire clamping. Moreover, since the draft angles of the moving and fixed molds are exactly opposite, the wire clamping on both sides will have obvious lifting, affecting the appearance. If the customer cannot accept it, only lateral core-pulling can be adopted.
(7) Piercing and rubbing through on the parting surface
"Piercing through" refers to the contact surface of the moving and fixed mold forming parts being perpendicular to or roughly perpendicular to the mold opening direction; otherwise, it is called "rubbing through". When the contact surface is parallel to or approximately parallel to the mold opening direction, it is also called penetration. From the perspective of the convenience of mold manufacturing, the sealing surface on the parting surface should be pierced by impact as much as possible to avoid being rubbed through. Except for round holes which can be pierced by insertion, insertion is generally prohibited for non-round holes. When there are large through holes on the plastic part and the impact penetration surface on the mold is large, the middle of the impact penetration surface should be left empty to reduce the impact penetration area and facilitate the FIT mold.
Komoditi Mould_Taizhou Jiefeng acuan co, Ltd. (jfmoulds.com)
Four: Positioning of the parting surface
The guide pins and guide sleeves of the moving and fixed molds are clearance fits. They mainly serve to guide. The positional accuracy of the formed parts must be guaranteed during the design of the parting surface. If the plastic part is complex and the parting surface is inclined or curved, the shape and size of the sealing surface, how to position it, and there must be a measurement reference when designing the parting surface must be taken into consideration.
Even for planar parting surfaces or stepped parting surfaces, in order to improve accuracy, conical surface positioning is sometimes designed on the parting surface.

Maklumat Berkaitan
Kedudukan masuk gam acuan diseret dan hangus
2025-08-06
Kedudukan salur masuk gam pada acuan diseret dan hancur gam masuk ...

Fokus pada kualiti dan mendalam memupuk inovasi
2025-07-05
Fokus pada kualiti dan mendalam memupuk inovasi dalam kehidupan seharian, dari mobi...
Kepelbagaian perusahaan acuan suntikan
2025-06-28
Kepelbagaian acuan suntikan enterprises1. Acuan automotif: memandu...
Acuan suntikan yang biasa digunakan enam jenis bahan acuan
2025-06-19
Pilihan keluli bukan sahaja memberi kesan kepada hayat perkhidmatan acuan, tetapi juga...
Periksa ketebalan dinding
2025-09-17
Periksa ketebalan prinsip -prinsip dinding untuk mereka bentuk ketebalan dinding o ...

Panduan komprehensif untuk acuan suntikan: dari asas ke aplikasi
2025-07-11
Panduan komprehensif untuk acuan suntikan: dari asas ke aplikasi dalam...